From Theory to Practice: Implementing RAG architecture using Llama 2, Vector Store and LangChain


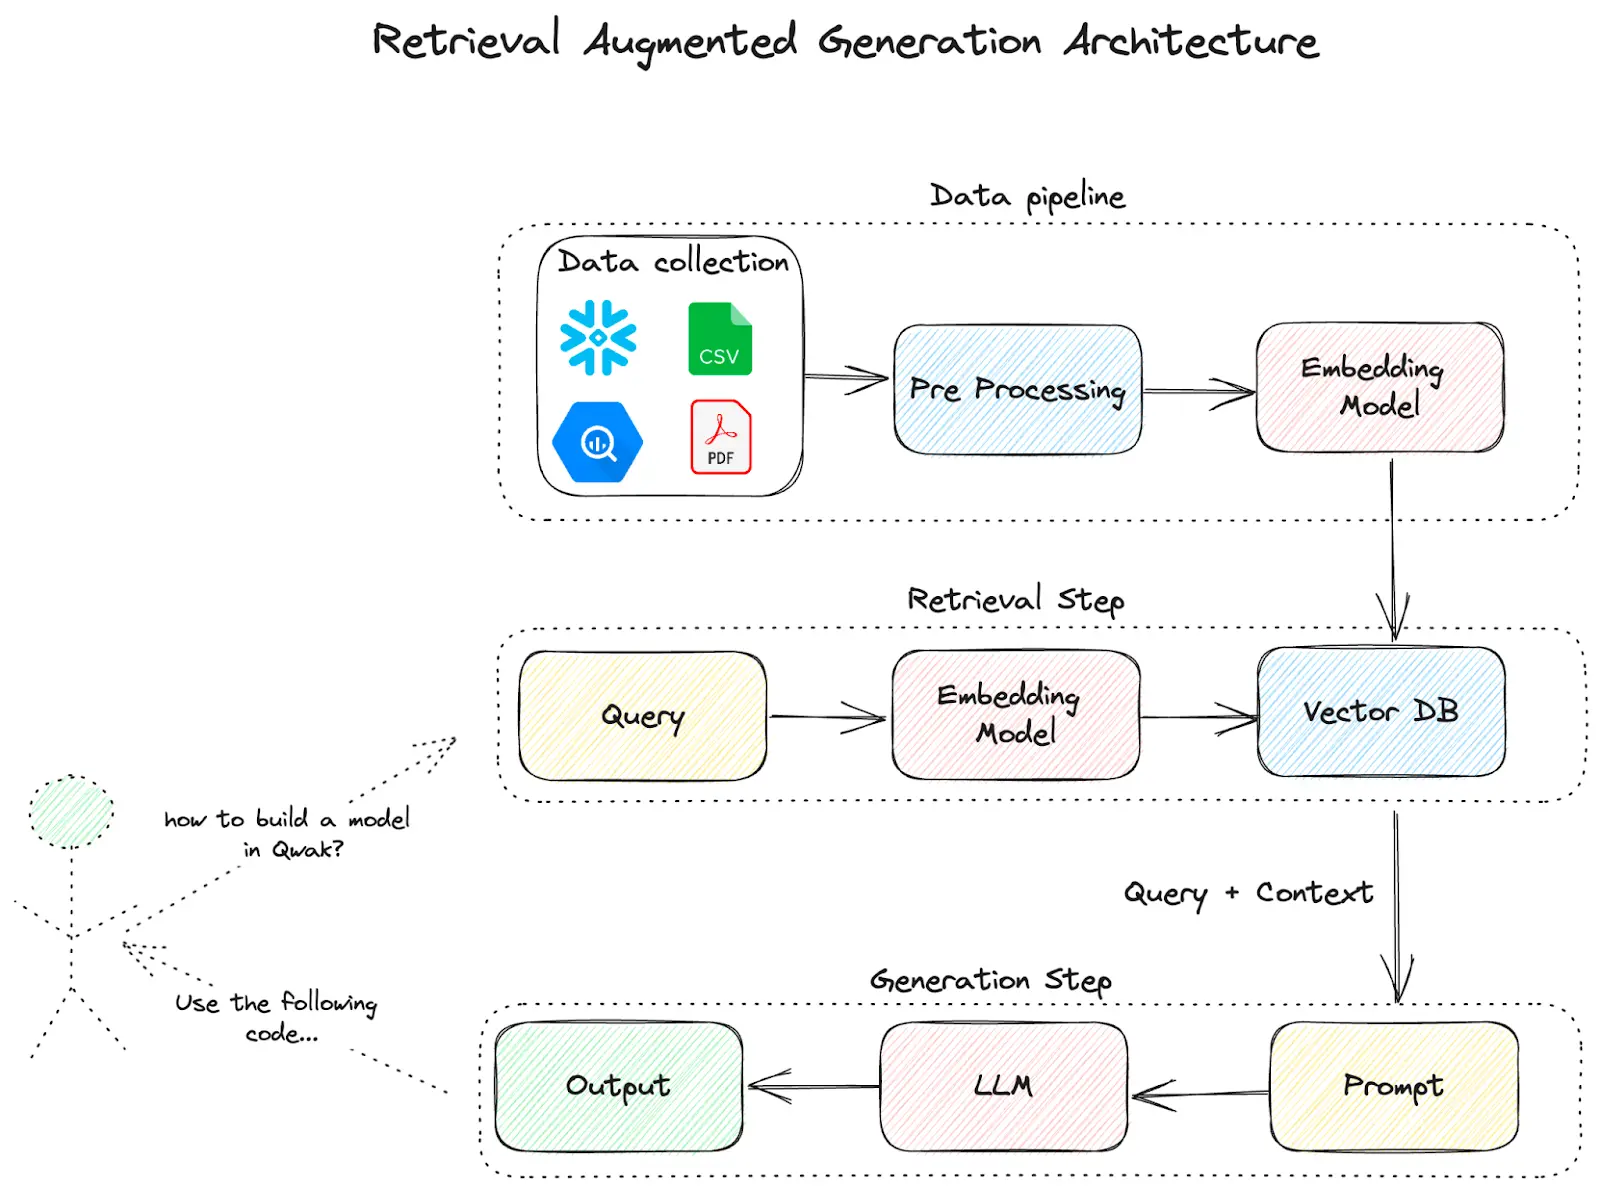
As we’ve discussed in previous posts about RAG & LLMs, RAG, or Retrieval Augmented Generation, can be a powerful framework for strengthening the capabilities of large language models and providing the context and information necessary to answer questions that are specific to your organization or use case. There are many different components that you can swap out to build a RAG pipeline, and Qwak provides several solutions to make this easy.
In this blog, we’re going to build a Qwak chatbot that answers questions about Qwak documentation and generates Qwak specific code and examples. To do this, we’ll be using Llama 2 as an LLM, a custom embedding model to translate natural input to vectors, a vector store, and LangChain to wrap the retrieval / generation steps , all hosted and managed within the Qwak platform.
Deploying Llama 2
First we’ll need to deploy an LLM. Any LLM with an accessible REST endpoint would fit into a RAG pipeline, but we’ll be working with Llama 2 7B as it's publicly available and we can pull the model to run in our environment. To access Llama 2, you can use the Hugging Face client. You’ll need to create a Hugging Face token. You’ll also need to request access to Llama 2 within Hugging Face and agree to Meta’s terms of use for the model (Note: this can sometimes take a few hours to get approved). Once you have your token and access approval, you can store the token as credentials using the Qwak Secret Service. Now, we can get started building and deploying Llama within Qwak.
In a local code editor, you’ll import and create a model class wrapping the Qwak Model Interface. The Qwak Model class has two main functions:
- build() - the entrypoint for training our model
- predict() - the entrypoint for serving predictions of our model
Since our model is pretrained, our build logic is actually pretty simple. We retrieve our Hugging Face credentials from the Qwak Secret Service Client, and pull the Llama 2 build from Hugging Face. And that’s it!
For our predict function, we’ll need to define how we extract the prompt from the incoming data request. We tokenize the prompt using the model specific tokenizer from Hugging Face, pass that prompt to the model’s generate() function, decode the response, and return it to the user. If there was more information you wanted to include in the request such as a user_id or session token, you could also configure this in the predict() logic, but for now, we’ll keep it simple.
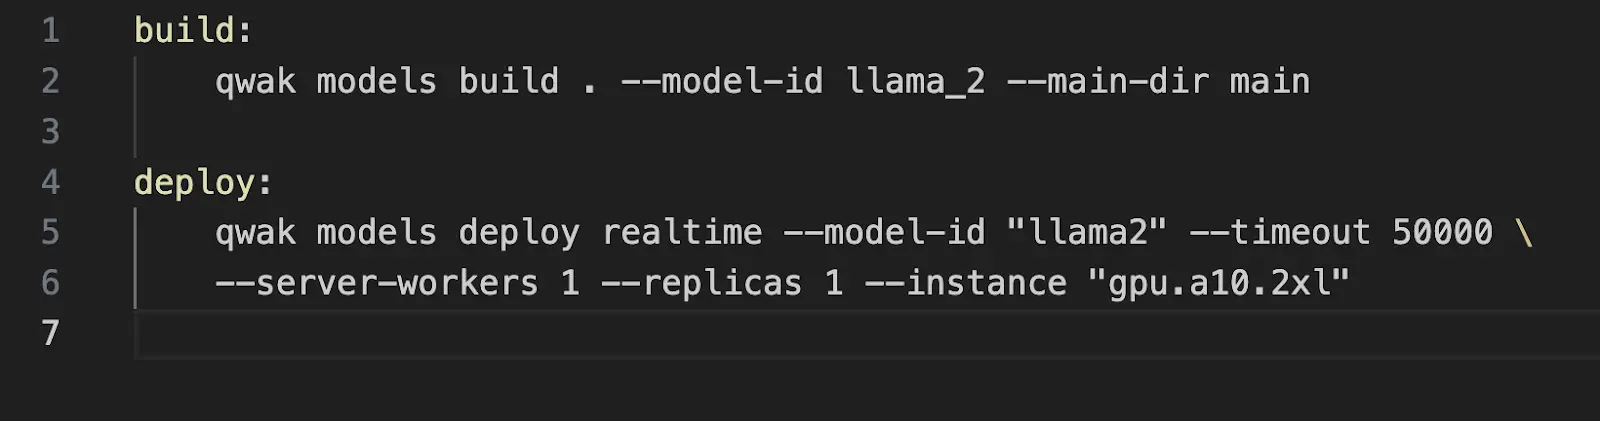
Now that we have our model built, we’ll kick off a build. You can see the commands for building the model below. While we aren’t actually training anything here since the model is pre-built, we’ll use the training process so we can store the artifact in the Qwak Build Repository so we can easily serve it as a real time endpoint.
Once our model has successfully built, we can deploy it as a real time endpoint. The command to deploy is demonstrated below. We’ll also add some deployment configurations and use an a10.2xl GPU instance as Llama2 7B requires quite a bit of resources to run.
You can find a full example of the Llama 2 implementation on Qwak examples repository here.
Deploying Embedding Model
Next, we’ll create a model that transforms and embeds our Qwak documentation text so that it can be persisted in the Qwak Vector store. For this model, we’ll be using the sentence transformer all-MiniLM-L12-v2 model from Hugging Face. We can use the same credentials from the first step of this tutorial.
Again, we’ll make a wrapper class around the Qwak Model Interface. Like the Llama build, we don’t need any complicated build logic since the model is pre-trained. In the predict function, we transform our input text into a list, so that it can be handled by the SentenceTransformer encoding logic, define the batch size, and add a few configuration settings.
We return a DataFrame with field output and value of a list of vectors.
We’ll also need to build and deploy the embedding model as a real time endpoint so we can call our embedding function when querying the vector store.
You can find an example of this model in our Qwak examples repository and step by step instructions for deployment below.
- Clone the repository locally
- Make sure you have the Qwak CLI installed and configured.
- Go to the sentence_transformers_poetry directory.
- Run make build to kick off the training job for this model. You can navigate to the Models -> Builds tab in the Qwak UI and monitor the progress of the build.
- Now that the model has been successfully trained and stored in the Qwak Model Repository, you can run make deploy to take this build version and deploy it as a real-time endpoint. You can also monitor the Deployment steps by going to the Models -> Deployments tab in the Qwak UI.
- When the Deployment completes, click on the Test Model tab in the upper right hand corner of the platform, and Qwak will generate example inference calls that you can use to call your real time endpoint and test your predictions live!
Managing Embeddings in Vector Store
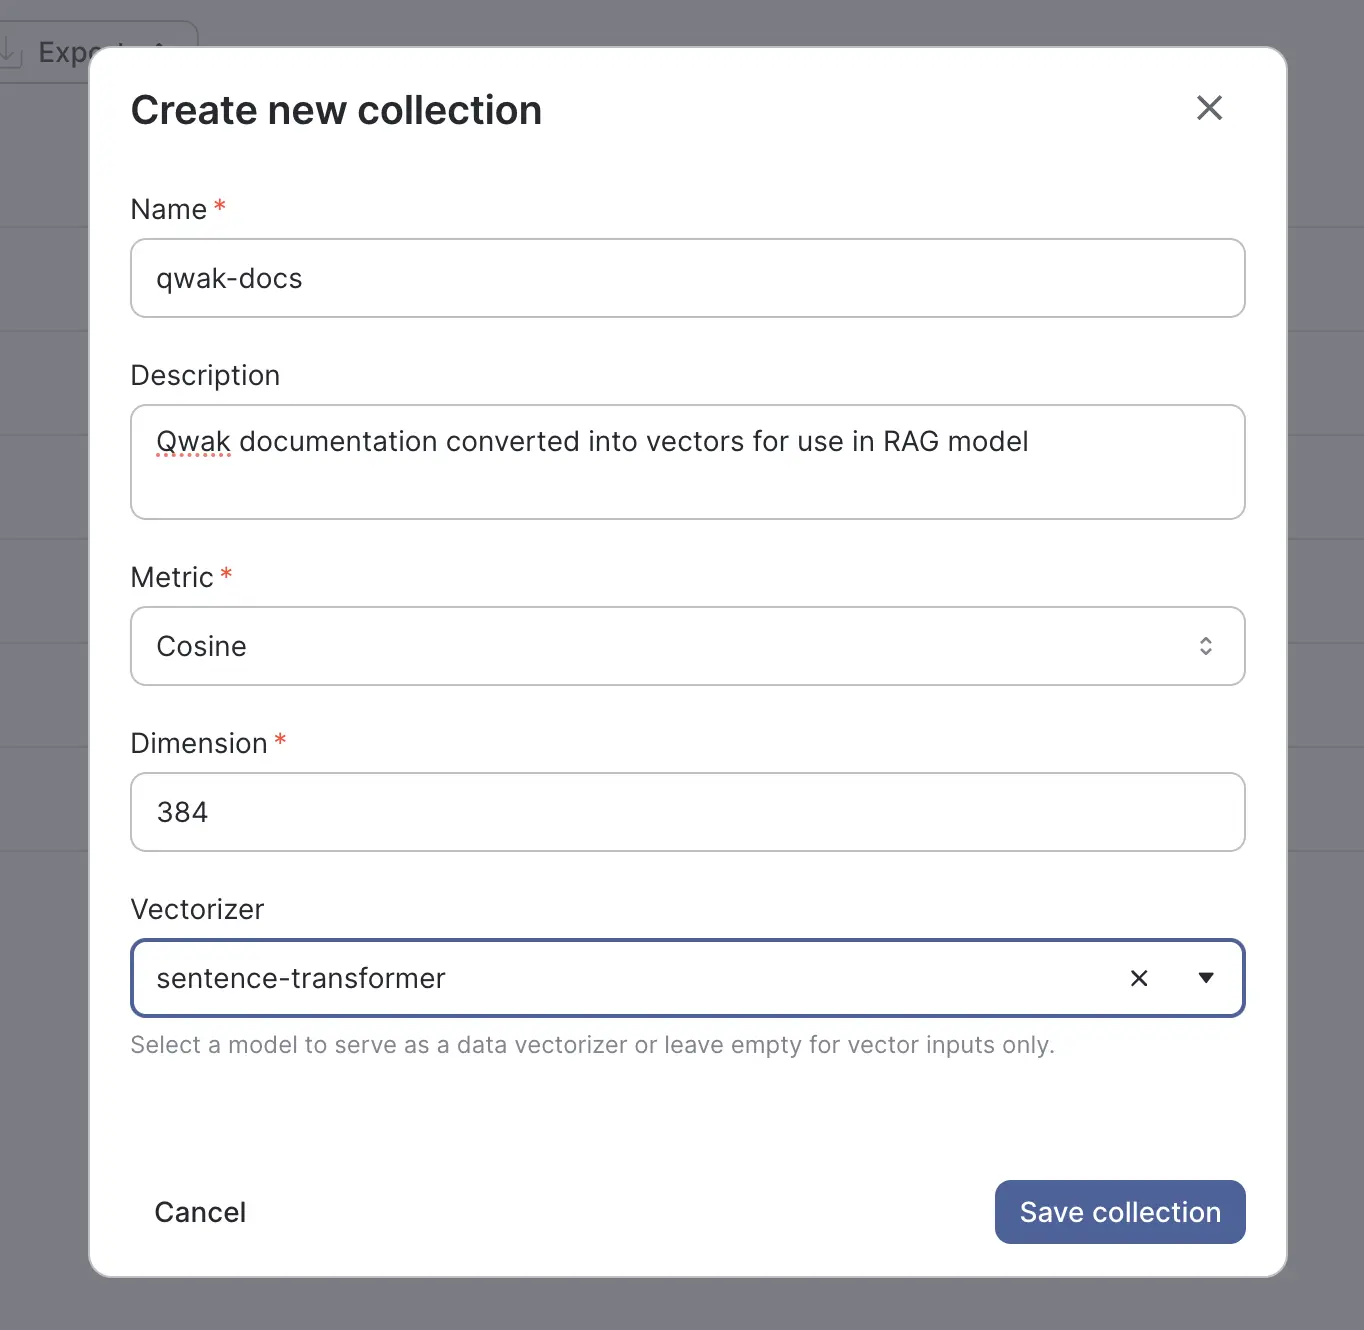
Collections are a Qwak organizational feature that allow you to structure and manage your various vector groupings across the vector store. Collections allow you to specify the metric configuration(cosine, L2) as well as the number of vector dimensions, providing fine grained control over the grouping and indexing of your data.
You can create collections in the UI, or define the collections as code using the qwak-sdk. For this tutorial, you can see an example collection we’ve created below. We select the cosine metric for grouping and 384 dimensions to be used in the vector plane. We also need to select a vectorizer.
A vectorizer is a deployed Qwak model that accepts data as an input and returns a vector in its predict function - just like the model we created in the previous step! Here we select the sentence-transformer model that we just deployed, and the Qwak Vector Store will automatically use this model’s embedding function when preparing input data for insertion or searching the vector store, allowing us to send free text to the Qwak collections API.
Now that we have our model deployed and our collection in place, we are ready to start inserting our vectors.
Load Vectors
With our LLM, embedding model, and collection in place, we are ready to insert our documentation into the vector store. We’ve collected the documentation as a series of raw markdown files that are stored in a directory.
Once we read the Documentation markdown files, we need a way to split up the pages of data so that they can be usable vectors. This is a crucial step as it will drastically determine the performance and relevancy of your search results that you will feed into your LLM. If you parse too minutely, by line or every few words for example, the results will be very fine grained and you’ll be forced to pass in many records into your RAG prompt. If you parse loosely, say by each page of documentation, you run the risk of missing relevant results that might be spread over multiple pages. Ultimately, the logic and size of parsing requires experimentation, knowledge of your underlying data, and often a mix of different sizes or even duplication of vectors to produce the best results.
Since our Documentation has relatively concise sections that all begins with titles, we’ll split our lines on `##`, the markdown notation for header, so each major section will represent one vector.
After we read our documentation into chunks, we configure the properties that will accompany the vector once we store it in the Qwak vector store, including the text chunk_id, the chunk_parent_id or the page title, and the chunk_text.
With our data properly formatted, we’re ready to insert into the Qwak Vector store. We create an instance of the Qwak VectorStoreClient, and fetch the `qwak-docs` collection we created in the previous step. The collection object provides an upsert command that lets you directly insert raw data into the vector store. When raw data is upserted, Qwak will automatically call the sentence-transformer embedding model we defined when configuring the collection to convert the natural input into vectors before insertion and indexing.
The Upsert function has three fields
- Ids - A unique identifier for each vector
- Properties - a list of dictionaries containing the metadata properties of the vector you want to store
- Natural Input - The raw input data that will be converted to vectors
- Data (Alternative to Natural Input) - List of vectors to be stored in the DB - if the data is already converted to vectors
For this upsert, we’ll pass in uuid’s for the vector id’s, the article chunk text for the natural input field, and the entire parsed JSON object as the properties field.
Now that our data is stored in the Vector Store, we can query it to make sure it’s working. You can navigate to the Collections tab in the Qwak Platform, and directly query in the UI.
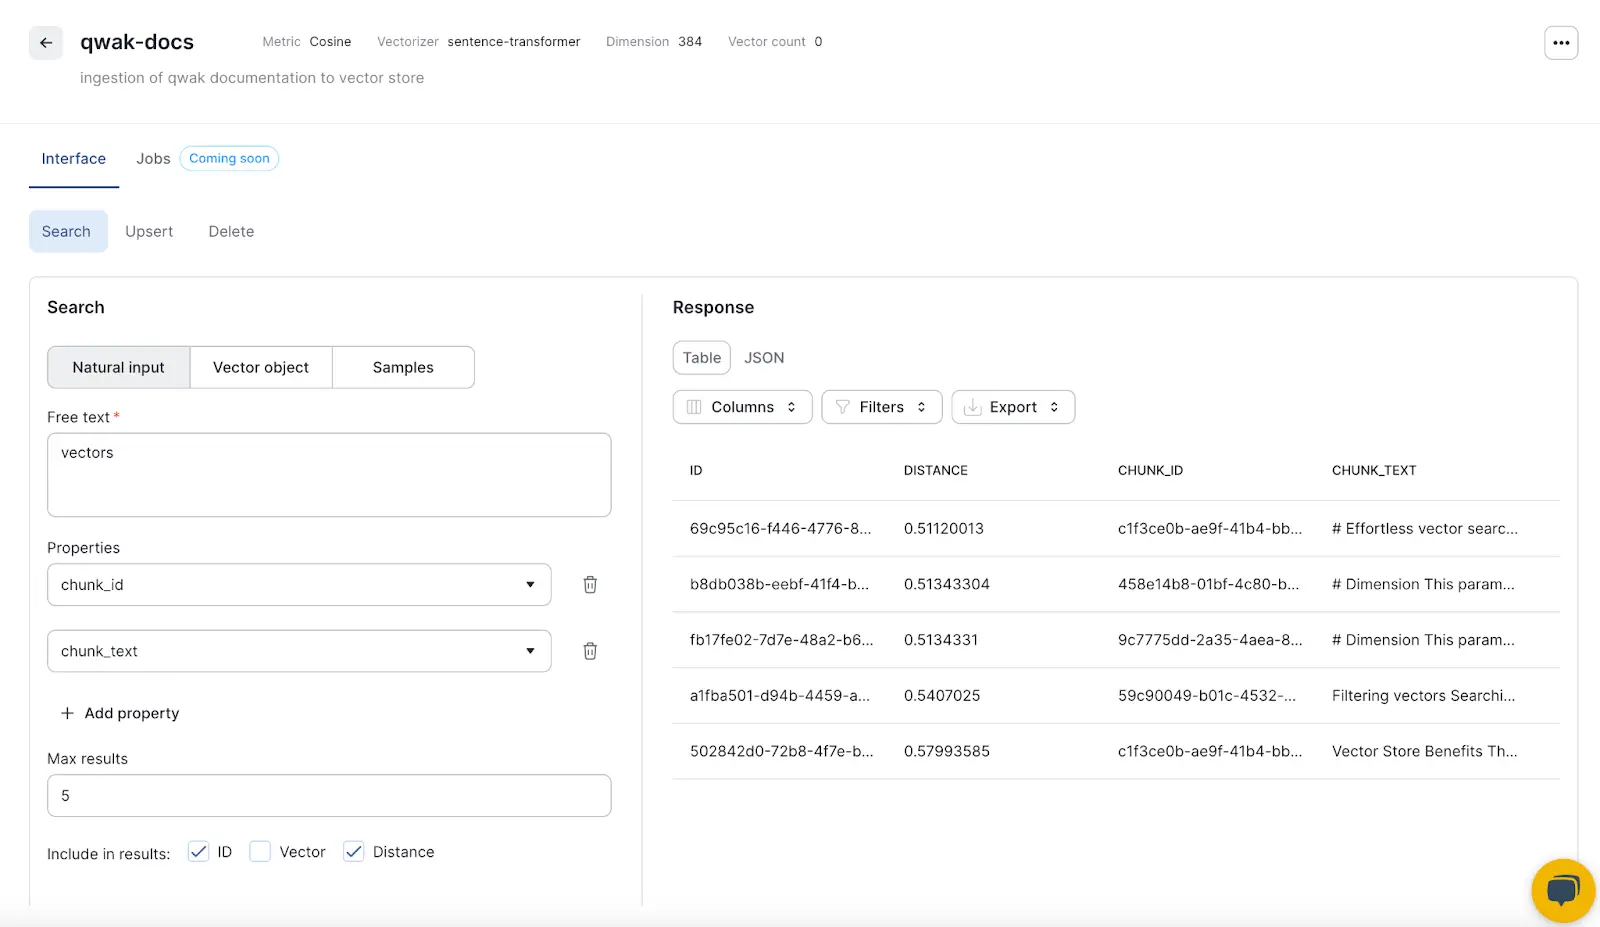
Additionally, you can search the vector store using the VectorStoreClient
Build RAG Pipeline with LangChain
Now it’s time to put it all together and implement our RAG model to make our LLM usable with our Qwak Documentation. We’ll use LangChain as the RAG implementation framework, and we’ll use Streamlit, which is a skeleton framework for generating a chat UI/API interface, for demoing our chat functionality.
What is LangChain?
LangChain functions as a versatile interface for almost any Large Language Model, offering a centralized development environment for creating LLM applications and seamlessly incorporating them into external data sources and software workflows. Its modular design enables developers and data scientists to effortlessly compare various prompts and foundation models without extensive code rewriting. This modular framework also facilitates the development of programs utilizing multiple LLMs. For instance, an application could employ one LLM to interpret user queries and another to generate a response.
.webp)
LangChain Modules
LangChain has several modules and libraries that significantly aid in the development of RAG workflows:
- Prompts: Build dynamic prompts with adaptable templates, adjusting to different LLM types based on context window size and input variables like conversation history, search results, or previous answers.
- Models: Abstract layer that allows you to create your own model or connect to various third-party LLM APIs, featuring API connections to around 40 public LLMs, chat models, and embedding models.
- Memory: Grant LLMs access to conversation history.
- Indexes: Structure documents for optimal LLM interaction, offering utility functions for document work and integration with diverse vector databases.
- Agents: For applications requiring flexible chains based on user input, an agent accesses a suite of tools and decides which tool to call based on the input.
- Chains: LangChain provides a standard interface for Chains, facilitating the chaining of LLMs or other experts for more complex applications. Common chain implementations are included for convenience.
In this example, we’ll be utilizing the Model and Chain objects from LangChain. Llama 2 will serve as the Model for our RAG service, while the Chain will be composed of the context returned from the Qwak Vector Store and composition prompt that will be passed to the Model.
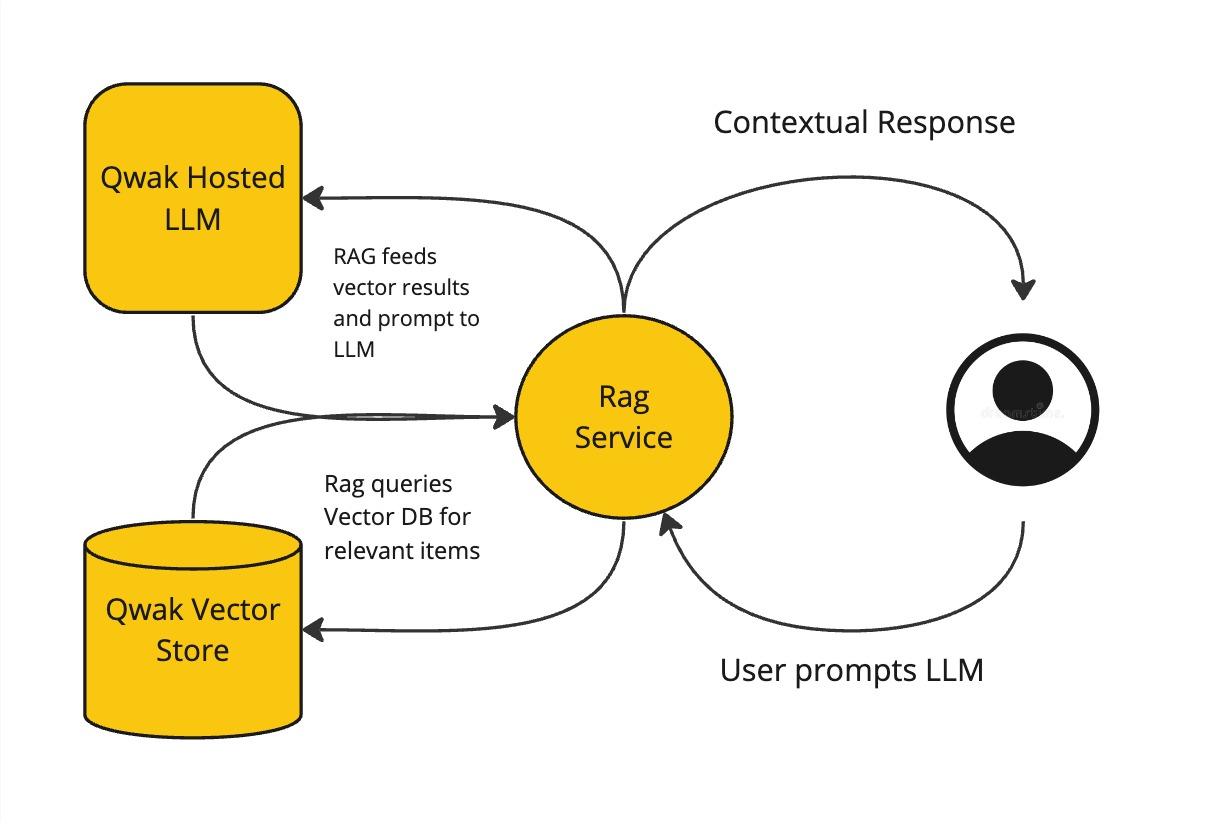
Components of RAG Service
When we query our service, the initial prompt will be passed to the Streamlit API. In the Streamlit application logic, we instantiate our Chain object. The Chain object will first take our prompt and issue a query against the Qwak Vector Store. With the vector response, the chain object will construct the final prompt including both the results from the vector search and the initial user query. Then the chain will execute the final composition query against the Model/LLM to return our completed prompt to the user.
While LangChain obfuscates much of the complexity around defining these Vector/Model configurations, it still provides ample flexibility and customization to incorporate additional logic. For instance, when you receive the query response from the vector store, you could further filter the results in Python to remove unwanted context, avoid harmful content, or limit the scope of the results to the organization or client of the user issuing the prompt.
Building the RAG Service with Llama 2 and LangChain
The logic for the Streamlit application is below. We implement the get_text() and extract_answer() helper functions to allow us to handle the incoming prompt from the user and the output that is returned from the LLM. In the main() method, we implement the logic to create the chain object from LangChain, issue a query against the Qwak Vector using the prompt sent in from the user, then pass the results of the Vector query along with the initial prompt to the LLM to receive our context specific answer. Let’s dive a bit further into the chain implementation.
A chain is a wrapper object used to define an LLM that we’ll be querying and the vector context to be passed in from the vector store query. The chain includes a default prompt template that can be used to cater/focus the context of the query. The chain packages together the initial query, as well as the relevant context returned from the Vector Store, to build one prompt with all the information needed to answer our specific questions related to the Qwak Documentation.
For the LLM, you can choose from a number of different LLM objects available in LangChain such as OpenAI or Bard for managed LLM’s. We’ve implemented our own Qwak LLM object that you can see below. The Qwak LLM object which wraps the LLM interface from LangChain and defines a _call() method that specifies how to issue the query to the LLM. In the code below, you can see that we create an instance of the Qwak RealTimeClient, specifying the model_id from the Llama 2 model that we built and deployed in previous steps, and issue a query against that model using the predict() method.
We can now deploy the Streamlit/RAG service and use our interface. In a local python environment, make sure you have the Qwak SDk and Streamlit installed, and run streamlit run app.py . The service should open a browser on localhost and you can begin prompting. You can see an example of the query functionality below
You can find the full example project of this blog post in our Github here.

Conclusion
While RAG architecture is simple conceptually, there are several components that can be challenging to implement and deploy. With Qwak, you can easily build, deploy and orchestrate each of these services - LLM, Vector Store, custom embedding model, RAG service - and manage them all in one platform.
Say goodbye to complex AI/ML
Chat with us to see the platform live and discover how we can help simplify your AI/ML journey.